
Cheeky-Thomas
INDEPENDENT VESPA SPECIALIST

Engine Rebuild.
Again not really a how-to but i get loads of people saying how they will happily work on the old 2 strokes, but get scared when it comes to a 4 stroke, this is to show that theres not really much to them, and that its all fairly straight forward once you get down to it all.

Here we have a 2006 Vespa 250ie engine that stopped while in use, no warning lights or noises occured before its failure, and suprisingly it was full of oil, normally these engines only fail through oil related issues, incorrect grade or quantity. So the engines been removed from the machine and its now a case of stripping it down and finding what went wrong and getting it rebuilt for the owner.

Always the starting point when im gonna strip and engine is to drain the oil, as well has having an oil filter, these engines have a prefilter strainer behind the sump bung, and as you can see this ones got debris in... brass coloured flecks which tells you its very serious indeed.

Theres plenty of the debris loose and floating in the oil too. This engines not gonna be a cheap fix.

Removed the oil sump pan and yep theres more debris in here too. With this much debris there wont be much of this engine reused, so lets find out where it all came from and why.
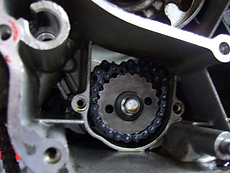
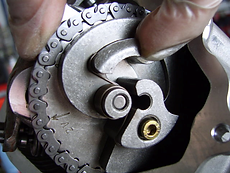
So a quick blast out with degreaser and the cause of the failure is easy to see, the oil pump drive chain has snapped, so the oil flow will have stopped and its simply siezed up. So we know the top end with be damaged as all its lubrication is pumped where as the crank is also splashing in it, but the question that makes the biggest difference to these engines repair bills is if the main bearings are damaged, lets strip it down and check.

Ive skipped showing all coming apart as ill show a lot more photos of it going back together in detail, so far ive just taken the topend off, and the side casings as im trying to get the crankcases apart to check the main bearings and crank.

Still more debris coming out while the cases are coming apart, its really not looking good.

Well the crankshaft is out and its scrap, the bigend has fell apart and theres signs of some serious heat build up in it.

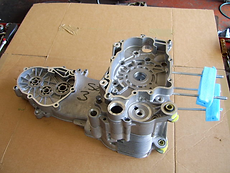
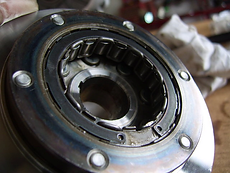
And here is the worst bit of news, the main bearings are damaged, and as they are a non-replaceable part it means new cases are required which isnt cheap.

So with what we now know is damaged its a case of put everything on hold and get a list of parts ordered to rebuilt it. No point stripping it all down until theres new cases to put it back into.
To the parts ordering website we go....

Well a few days later a whole shed loads of parts arrive, here is the new crankcases...

As you can see theres a whole load more bits there too... new cylinder and head, not to mention a new crankshaft.

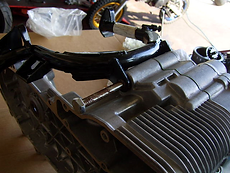
Theres a new throttle body which ill explain later, but also if you look carefully a new camshaft, timing guides, chains and sprockets and lots of gaskets etc.

This side is no better... what a shame. It just shows how quickly damage can occur when things do go wrong.
Right then lets start rebuilding this engine, to start with we need to open up these crankcases and fit the crankshaft..

So here is the new crankhaft along with the old one, you can see both are in the same position but the new ones conrod is clearly longer as its sitting in a different position, this is because as im replacing all main components, instead of building it as a 250 im using the parts from a 300 version.
Those used to 2strokes will be shocked at the poor quality finishing of the crankshaft webs and such.
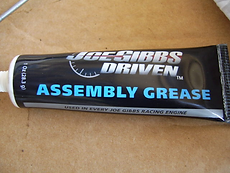
Throughout the rebuilding as well as pre-oiling parts ill be using this entire tube of assembly grease to ensure maximum lubrication on new parts during initial start up. It simply disolves with heat and blends with the engine oil, and will get changed after the first 625 miles of running in.
So we start by putting the new crankshaft into the new casing, with its bearings greased up already.. a nice new gasket is fitted and ready for the other side casing to be bolted on.

Now we fit the other side of the case and torque it down as required, the spec for this is 11-13NM.

Now a few sundries to be fitted, like the oil pressure switch, oil filter fitting and obviously a new oil strainer assy.

This machines getting a new stand as the old one was slightly bent, but also needed severe heat to get it apart so it wasnt worth the risk reusing it, so i got a new one, heres the bits and ill fit it now to the new engine so it can stand up by itself, makes it much easier to work on.


So to start with we will fit the new steel sleeve into the crankcases, plenty of copper slip on first to aid future removals.
Now fit the stand into place and fit the new centre bolt after also covering it in a ton of copper slip, this stand wont be one of those sticky ones thats for sure.
After fitting the nut and tightening it up, we now fit the new springs, its a dual spring, one inside the other... tricky.


So now its time to start putting the topend on, so we will open up the barrel kits as we need the pistons, heres the old and the new one side by side.
Heres a closer picture of the new pistons, you can see the crown shape is a little different and the new one is marginally larger in diameter as its for the 300 engine.
Here you can see the difference in the piston height a little more clearly... not much really is it.
Heres a close up showing just how little the difference is, but the small amount here and the difference in conrod length is enough to make the difference. Bye bye 250 and hello 300.


So after a little lube on the little end bearing surface its time to fit the new piston, gudgeon pin and circlips.
So far its looking good, putting the piston at TDC to aid getting the barrel on in a minute.


Right then before we fit the barrel we need to fit the upper camchain guide which is bolted into the crankcase and pivots, not to mention we need to fit a base gasket. I havent got pictures but you need to fit the right one by measuring the piston to barrel protrusion with a dial gauge, piaggio sell the gaskets in 0.4 / 0.6 & 0.8 mm variants to get the measurement just right.. in this case its a 0.4mm.
Here is the old barrel and the new barrel side by side, hard to tell much difference between them really.. you will notice the new 300 barrel has an extra couple of water ways machined at the very top of the picture.
So now we have the new barrel fitted down into place, all looking good so far.
And now we can slot in the lower camchain guide which has locating pegs into the barrel and into the crankcase at the bottom.


The gasket even has a tab telling you the engine size its made for, in this case 300.
Now its time to drop the head gasket into place and the 4 o-rings around the barrel studs.

Right then as its a rebuild, i would always use a new camchain as its not worth reusing an old one thats been through the stresses of being involved in a engine siezure.
Leave the excess chain hanging out the top, always keeping some tension on it so it doesnt fall down the hole, if it does a small pencil magnet will fish it back out, been there done that. When we put the head into place we will need to feed the chain through that as well.
So drop the chain down the barrel mouth so you can see it at the bottom, feed enough down to get it over the crankshaft, then slide the bottom timing gear onto the crank, make sure you align it on the woodruff key.


Heres the old cylinder head with the new bare item, some bits will be swapped but most moving parts will be new.
Again its new cylinder head and old, this time viewed from underneath so you can see the valves. This item fits all engine sizes from 125 to 300.
So lets drop the new cylinder head into place on the barrel, making sure the camchain is pulled through and left hanging so we can get to it in a minute.
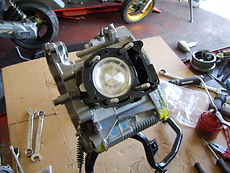
So here is where we are currently at, starting to look more like an engine now. Time to get it bolted down and torqued into place, then get the head fitted with all its odds and sods.


So now its time to strip the old head and swap some of the bits from one to the other.. new rocker arms and pins will fitted. But the thermostat housing will be reused, and the coolant temperature sensor.
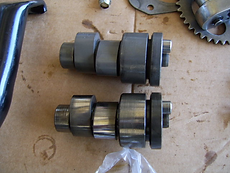
As the topend got oil starved, we will fit a new camshaft as the original had suffered slight pitting to the lobes, while it doesnt look too bad now, the damage if reused would soon get worse.
Old and new camshafts side by side... not much difference to be seen.
So plenty of assembly lube and slide the camshaft into place, then more lube on the followers and there locating pins. We will do valve clearances later hence the adjusters being so far off.
Now we fit the camshaft retainer which is held in by 2 screws, and then fit the camshaft sprocket with the chain. We already had the piston at TDC so it should be fine, and the upper timing mark is the arrow on the pulley to the line on the head, theres dual markings, 2v or 4v depending on application, in this case as theres 4 valves in the head we use the 4v marking. We will check timing marks at the end to be extra sure.
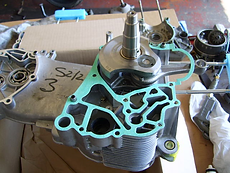
So thats all the timing gear and valves in place and looking good.
Heres a little shot of the automatic decompressor, its centrafugally operated and show here in the on position.
And here is how it will sit once the engines running and the camshaft is spinning fast... the off position.


Progress so far...
Things are looking much better now, lets get the camchain tension fitted so we can rotate the engine and make sure nothing hits.
And here it is in place, bolted up and ready to go.
The old and new tensioners, a simple item, a spring loaded ratchet, you remove the spring, retract the plunger and fit it to the engine, then fit the spring which forces the plunger outwards onto the guide at a preset tension determined by the spring.


So here we have the old and new oil pump assy, while the pump may have been ok, as it will have possibly had the metallic contamination pass through it, i wouldnt risk it for a rebuild of this costing.
Inside the old oil pump, quite a simple really, all looks ok but i will still fit the new one, better to be safe than sorry.
So lets fit the new oil pump, this is its fitting inside the engine casing, the 2 oil ways are oil into the pump and oil out to the engine...
Time for a new gasket... its designed so that it only fits in a certain direction so you cant get it wrong.
So now we bolt the pump itself into place, youll notice the centre spindle has a flat on one side which is the location for the drivegear which we will fit in a minute.
We need to fit this spacer washer onto the crankshaft which stops the camchain and oil pump chains catching each other during engine running...
This little o-ring is vital and often forgotten, it seals the centre of the timing gear, and gets hidden when the gear is in place. But if you get a machine and its crankseal is leaking so you fit a new one and it still leaks check that this o-rings not split as it will let oil leak out from the centre.
So now we can fit the oilpump gear into place, the oil pump chain on, and the drive sprocket onto the crankshaft. Looks good.
Word of WARNING here, the oil pump drive sprocket does not have a woodruff key, it relies entirely on being held by friction from the assembly being tightened up on the crankshaft, which is why you must NEVER run a GTS with the variator removed, if you do the oil pump will slip and the engine get damaged. Be warned.

Now we can jus bolt the oil pump gear into place and fit the splash shield... nearly time to fit the sump pan now.


So that the pressure valve fitted, just the gasket needed and to fit the sump. Next up the very weird crankcase seal set up.
Before we fit the sump we need to fit the oil pressure bypass valve into the case... plunger first, then the spring.


Once the seals bolted to the tool, the whole assembly can be screwed onto the crankshaft threads.. and then the tool can be wound inwards to push the seal directly into place, its position being perfect due to the tools locating pin. Easy peasy.
Remove the tool and bingo new seal is done and fitted exactly where it needed to be. Ready to move onto the next step.
This is the main crankseal and a very oddball design indeed, you wont get a pattern one of these from the shop down the road. The 2 welded on nuts on the face are for the special tool to remove and also to fit the item.
From the rear youll see not only is it a seal its also part of the oil pump chain tensioner... which is why using the proper tool to fit it is crucial.
You first fit a sleeve onto the crank to aid the seal going over the step of the oil pump gear, it ensures the lip doesnt get damaged. Then you screw the special tool into the housing using the captive nuts...


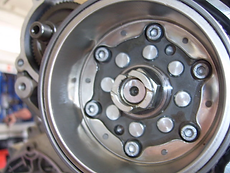


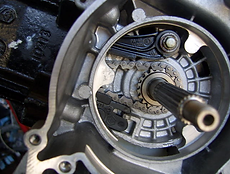
So now we will move to the otherside of the engine, so far ive fitted the starter bendix and the main starter ring gear assy.
This is the sprag clutch bearing, it allows the starter motor to be constantly engaged with the flywheel but only turn the engine when the bearing is grips one the right direction, once running it just freewheels, its bolted into the back of the rotor assy.
Now we just fit the rather odd shaped nut, ill explain its shape later.
So now the rotor is fitted to the crankshaft on its associated woodruff key...
This is the reason for the stupid shaped nut, its also a retainer for a spring set up that provides drive to the waterpump assy, the spring acts as a damper assy to dampen out shocks from the engines power pulses.
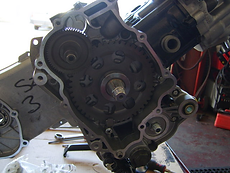
So heres things now, ive fitted an oil filter as once this case is fitted it can be filled with fresh oil. Fully synthetic 5W/40 oil as always. We have also fitted a new oil pressure switch.
So as the casing is now ready we will fit the new gasket and get ready to fit the casing.
So thats the casing now fitted to the engine and its looking much more like its ready to go. Time to get on with the final drive swap over, as its running in its own seperate oil, all the parts can be reused apart from bearings and gaskets.
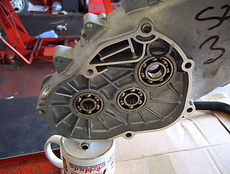
Inside the casing is the stator assy, its been cleaned and any debris or metallic flakes removed and then refitted into the casing.


Heres the three gears ready to be cleaned down and swapped over.
Its now time to strip the final drive out of the old engine casing.
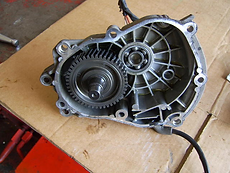
So we fit the new primary gear, and the intermediate gear and the dipstick...
Right then onto the new case, the 3 bearings are preinstalled so we are saved that job...
Last few bits needed from the old case, this includes the dipstick.
Im fitting a new output shaft seal just as a precautionary measure.
Thats the case fitted with new seal and output shaft, new gasket onto the casing and bolt it into place.
There we have it, all bolted up, just refill it with 75w/80 gear oil to the required marking (approx 250ml). Then just make sure all shafts turn as required and its good to go.


Thats the basics of the rebuild done. Added the starter motor and a few little bits here and there and then its ready to refit into the bike, then all the belt and bits can be refitted.
We can then set the valve clearances to 0.10mm inlet and 0.15mm exhaust and then refit the rocker cover into place.
We can then remove the studs, grease them and refit, and also fit the copper sealing gasket into the exhaust port.
So before we go any further we can check the timing marks are still in place which they are...